This guide is designed to help new users gain an understanding of triggers. It is by no means a substitute for experience and testing, but it is enough to understand the inner workings of most trigger systems.
The Trigger Menus
The Edit Menu

The lower half of this menu shows various settings for triggers for the selected section.
Trigger On Action:
When something happens, the trigger will activate. When a trigger activates, the section will carry out the settings provided in it's "Mode" at the bottom of this menu and the parameters provided in the "Edit 2" menu, explained later.
Disabled - Default, non triggered setting
Frames Elapsed (Self) - When the section itself has counted a number of game frames, the trigger will activate.
Key Pressed (Self) - When one of the three keys for this option is pressed (you choose which one), the trigger will activate.
Rot. Reach CW Border (self) - If the section is rotating clockwise and it reaches the angle of rotation set by its "CW Border" setting in the "Edit 2" menu, the trigger will activate.
Rot. Reach CCW Border (Self) - Same as above, only with counter-clockwise rotation.
Mov. Reach Target (Self) - If the section is a moving section and it reaches its movement distance set by "Target Distance" in the "Edit 2" menu, the trigger will activate.
Mov. Reach Origin (Self) - If the section is a moving section and it reaches its original location setting when returning from its "Target Distance" setting in the "Edit 2" tab, the trigger will activate.
(Unreliable) Fade Reach Hi Limit (Self) - If the section is fading, when it fades back in to its maximum opacity as set by the "Hi Limit" in the "Eff" tab, the trigger will activate.
(Unreliable) Fade Reach Lo Limit (Self) - If the section is fading, when it fades to its minimum opacity as set by the "Lo Limit" in the "Eff" tab, the trigger will activate.
The following trigger actions require a trigger link.
Trigger Link - A blue arrow showing an on trigger or red for an off trigger. The arrow is created by selecting the section that has the trigger parameters (hereby known as the Receiver Section) and right clicking another section or a weapon (hereby known as the Signal) and selecting which of the four trigger parameters it is supposed to function with. A link can function for one to four triggers for a single section. There is no limit to the number of receivers for a sender.
If The trigger is activated by the firing of a weapon, select the section, then right click the weapon and select "Set on Trigger 1". The section's "Trigger on Action 1" must then be set to "Weapon Fire".
Rot. Reach CW Border - If the linked section rotates clockwise and it reaches the angle of rotation set by its "CW Border" setting in the "Edit 2" menu, the trigger will activate.
Rot. Reach CCW Border - Same as above, only with counter-clockwise rotation.
Mov. Reach Target - If the linked section is moving and it reaches its movement distance set by "Target Distance" in the "Edit 2" menu, the trigger will activate.
Mov. Reach Origin - If the linked section is moving and it reaches its original location setting when returning from its "Target Distance" setting in the "Edit 2" tab, the trigger will activate.
(Unreliable) Fade Reach Hi Limit - If the linked section section is fading, when it fades back in to its maximum opacity as set by the "Hi Limit" in the "Eff" tab, the trigger will activate.
(Unreliable) Fade Reach Lo Limit - If the linked section is fading, when it fades to its minimum opacity as set by the "Lo Limit" in the "Eff" tab, the trigger will activate.
Weapon Fire - When the Linked weapon fires a shot, the trigger will activate.
Weapon Acquired Target - When a target comes into the firing arc and range of the linked weapon, the trigger will activate.
Weapon Lost Target - When the linked weapon can no longer turn to follow a target, it moves out of range, or is destroyed by another ship, this trigger will activate. This trigger will not activate if the ship with the trigger destroys the target that the weapon is following.
Mode - This determines which set of parameters that the section uses, be it movement, rotation, or both. Fading is unreliable.
Move - Uses movement prameters
Rotate - Uses rotation parameters
Move + Rotate - Uses movement and rotation parameters at the same time.
The Edit 2 Menu

Moving - Determines whether or not the section uses the parameters automatically.
Enabled - Moves on its own.
Disabled - Does not move on its own. Can move using triggers, though.
Target X/Y - The specific coordinates that the section will move to. (Updates automatically when other parameters are changed)
Target Distance - The amount of pixels (shift + arrow key movements) that the section will move.
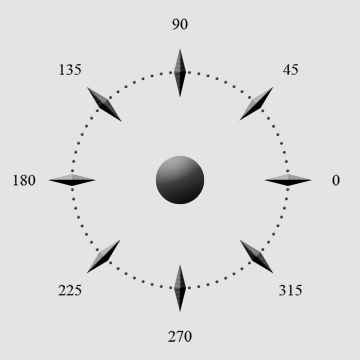
Target Direction - The direction that the section will move. The angle calculations are awkward, please refer to the following chart for clarity. All numbers are according to the ship's orientation in the shipmaker. If the ship is in the game and turns, do not worry about it. It a section is rotated by using mass rotation, remember to update its rotation angle by the same amount. As far as movements are concerned, if a moving section is on a rotating section, the game treats its movement angle as though it was not rotating at all, so rotations can be ignored for calculations.
Start Distance - The distance (in pixels) that the game will treat the section as having already traveled when it is spawned (you load the ship). Usually ignored except in special use cases.
Adv. Speed - The speed (in pixels per frame) that the section advances to the target from the origin. (Updates when advance frames is changed)
Origin to Target
Ret. Speed - The speed (in pixels per frame) that the section returns from the target to the origin. (Updates when return frames is changed)
Target to Origin
Advance Speed - The time (in frames) that it takes the section to move from the origin to the target. (Updates when Adv. Speed is changed)
Return Frames - The time (in frames) that it takes the section to move from the target back to the origin. (Updates when Ret. Speed is changed)
Adv. Delay - The time (in frames) that the section will wait after reaching the target.
Ret. Delay - The time (in frames) that the section will take to start moving and will wait after returning to the origin.
Counter - If set to positive, the section will move from the origin to the target. If set to negative, the section will move from the target to the origin. Not particularly easy to use.
Rotating - Determines whether or not the section uses the parameters automatically.
Enabled - Rotates on its own.
Disabled - Does not rotate on its own. It can rotate using triggers, though.
Start Angle - Starts the section at a different angle than it is displayed in the shipmaker. The new angle is able to be seen using the preview option (F11).
CW Rot Speed - The speed (in degrees per frame) that the section rotates clockwise. (Updates when CW Rot Frames is changed)
CCW Rot Speed - The speed (in degrees per frame) that the section rotates counter-clockwise. (Updates when CCW Rot Frames is changed)
CW Rot Frames - The number of frames that the section takes to complete its rotation while rotating clockwise. (Updates when CW Rot Speed is changed)
CCW Rot Frames - The number of frames that the section takes to complete its rotation while rotating counter-clockwise. (Updates when CCW Rot Speed is changed)
Borders - Determines if the section only rotates between two specifically set angles.
Enabled - The section rotates between the two provided angles (explained next)
Disabled - The section continues to rotate at a set speed, not stop.
CW Border - When the section is rotating clockwise, it will stop when its angle is this many degrees different than its original angle. This value is always either 0 or a negative number. (Edit tab: Angle).
CCW Border - When the section is rotating counter-clockwise, it will stop when its angle is this many degrees different than its original angle (Edit tab: Angle).
CW Delay - Time (in frames) before the section starts moving (the counter is positive or zero) and the time it will wait after reaching the CW Border angle before rotating back.
CCW Delay - Time (in frames) before the section starts moving (the counter is negative) and the time it will wait after reaching the CCW Border angle before rotating back.
Counter - Determines whether the section is rotating clockwise or counter-clockwise.
Positive or Zero - Rotates Clockwise
Negative - Rotates Counter-Clockwise
So here we have our tutorial ship, color coded for ease of explanation.

Movement Trigger Test
We'll start off by making the "wings" move backward, as if by recoil. The upper teal wing will have the following parameters. . .
Trigger on Action 1: Weapon Fire (Linked to the only weapon on the ship)
Trigger Off Action 1: Move Reach Origin (Self) (It will stop moving when it returns to its original position)
Mode: Move
Target Distance: 14
Target Direction: 180 (It will go towards the back of the ship)
Advance Frames: 10
Return Frames: 20 (It will take longer to return to position)
The total time for the frame movement is 30, which is one second in game time. 30 frames = 1 second. . . usually.
That's all it needs. Now it is mirrored and the parameters are able to be used on the opposite side.
So keep it in place, the upper blue section is given the exact same parameters except. . .
Target Direction: 0 (It will move forward, but with its parent moving backward, it will appear to stay in place).
Here it is, with all the section set up using a trigger link to the only weapon on the ship.

And Animated. . . Note how the lower blue section was not given a trigger setup or weapon link, so it moves with its parent section.
 Now to change its behavior.
The lower teal section was selected and had a trigger link set to its upper counterpart. The trigger on action was changed from "weapon fire" to "movement reach target". Note that this is not the (self) version. Now when the upper section reaches the back of the ship, the lower one will begin moving.

 Rotation Trigger Test
Now to make the "wings" rotate while keeping the upper blue section in place. These are the parameters that are used for the upper teal section.
Trigger on Action 1: Weapon Fire
Trigger off Action 1: Rotation reach CW Border (Self) (When it rotates back into position, it will stop rotating.)
Mode: Rotate
CW Rotate Frames: 20 (It will start rotating counter-clockwise, so this is the slower setting)
CCW Rotate Frames: 10
Borders: Enabled
CW Border: 0 (We want it to rotate clockwise back into normal position. If this is not zero, it will look odd when it stops)
CCW Border: 180 (It will rotate a half circle)
Counter: -1 (We want it to begin rotating counter-clockwise)
The ship is then mirrored. To keep the blue section in place, it is given the exact same parameters except. . .
Trigger off Action 1: Rotate reach CCW Border (It'll have to rotate in the opposite direction to appear to be staying in place. Just like moving in the opposite direction earlier)
CW Rotate Frames: 10
CCW Rotate Frames: 20 (It is rotating the opposite direction, so the values are basically being reversed)
CW Borders: -180
CCW Borders: 0
Counter: 0 (It'll start rotating in the opposite direction).
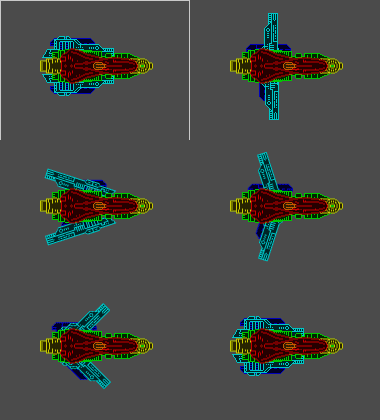
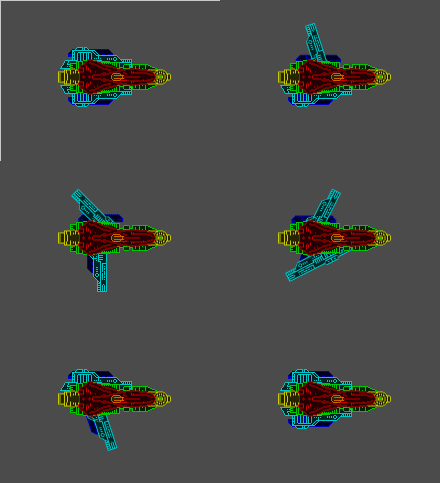
Due to positioning, it doesn't stay exactly in place, but its angle does stay stationary, which is the desired effect. Not to Link the lower teal section to the upper teal section as the movement trigger test.
The link is done as before, but the trigger on action will have to be changed to "Reach CCW Border". This is not a (self) function, so it can affect a target, it will start rotating when the upper teal section rotated counter-clockwise to its 180 degree border.
 Move and Rotate Trigger Test (With Intentional Errors)
Now to move them both together using rotation and movement. To stop move and rotate, it is easier to use a movement stop trigger command such as "Trigger off Action: Movement Reach Origin".
The rotations will be also kept linked to the cannon for this one. They can be linked to each other as before if need be.
All of the trigger parameters from the previous tests are kept except the following. . .
Trigger off Action 1: Movement Reach Origin (self) (The movement reaching the origin will stop both the movement and rotating cycles).
Mode: Move + Rotate
Upper Blue Section:
Advance Frames: 5
Return Frames: 10
(It will move and return to its origin twice as fast as it can rotate, so it will stop moving before the rotating can finish. It will return to normal when the cycle is repeated, because the frames are only half of the rotation time, 2 movement cycles will make a full rotation cycle.)
Lower Teal Section:
Advance Frames: 5
Return Frames: 10
(This "wing" will look odd as well. 2 movement cycles will put it back into place though.)
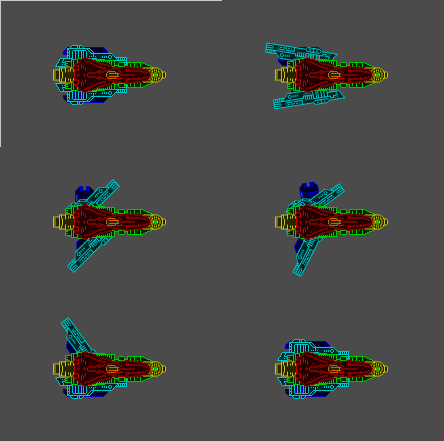
Result after one cycle. This was done on purpose. Although it is not very good looking, it is good that it is understandable.
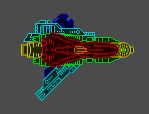
Two cycles, animated.
 Have fun, newbies
Zalausai
